How To Check Blood Pressure At Home | BMC Medical
A practical step-by-step guide to how to check blood pressure at home, including preparation, instructions, common issues, tips, and next steps.
How To Check Blood Pressure At Home
Monitoring your blood pressure at home provides a valuable record of your health for you and your GP. It helps create a more accurate picture of your blood pressure than occasional readings in a clinical setting, which can be affected by stress. This guide offers a careful, step-by-step process for taking an accurate reading using a validated home blood pressure monitor. Following these instructions consistently is essential for gathering reliable data to share with your healthcare provider. This information is for educational purposes and is not a substitute for professional medical advice.
Fast Answer
- Preparation: Rest quietly for 5 minutes before you begin. Avoid caffeine, exercise, and smoking for 30 minutes prior.
- Positioning: Sit upright in a chair with your back supported, feet flat on the floor, and legs uncrossed.
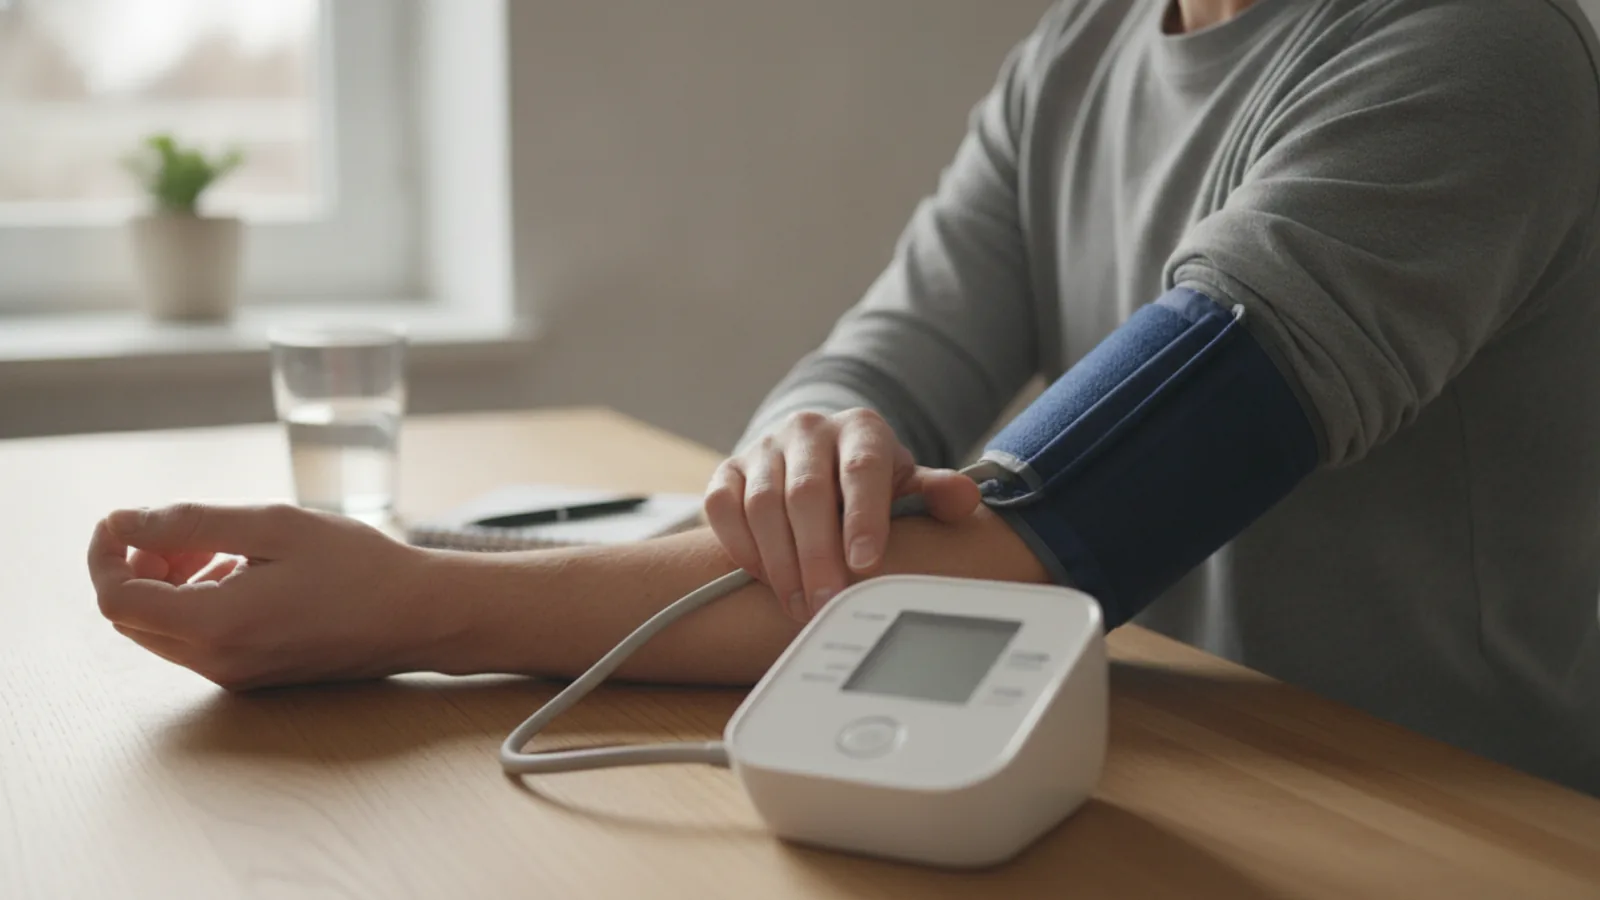
- Arm Placement: Rest your bare upper arm on a table, ensuring the cuff is level with your heart.
- Cuff Fit: Wrap the cuff snugly around your upper arm, about 2-3 cm above your elbow. You should be able to fit two fingers underneath it.
- Measurement: Stay still and quiet while the monitor takes the reading. Take two readings, 1-2 minutes apart, and record them.
Before You Start
Proper preparation is the most critical part of obtaining an accurate blood pressure reading. Rushing this stage can lead to incorrect numbers that do not reflect your true resting blood pressure. Set aside a few minutes in a calm environment where you will not be disturbed.
What You Need
- A Clinically Validated Monitor: Use an automated blood pressure monitor that measures on the upper arm. The British and Irish Hypertension Society (BIHS) maintains a list of validated devices recommended for home use. Wrist monitors are generally less accurate and should only be used if advised by a healthcare professional.
- The Correct Cuff Size: Most monitors come with a standard adult cuff, but you may need a smaller or larger size. The cuff's inflatable bladder should encircle at least 80% of your upper arm's circumference. An incorrectly sized cuff is a major source of error.
- A Quiet, Comfortable Space: You will need a chair with good back support and a table to rest your arm on.
- A Logbook: Use a simple notebook, a dedicated logbook, or a trusted app to record your readings, including the date and time.
Safety, Timing, and Context Checks
- Timing Your Readings: Your GP will provide specific instructions, but a common routine is to measure twice a day: once in the morning before taking any medication, and once in the evening before your meal. Consistency is more important than the exact time.
- Avoid Stimulants: Do not measure your blood pressure within 30 minutes of smoking, drinking caffeinated beverages (like coffee or tea), or exercising. These activities can temporarily raise your blood pressure and lead to a misleadingly high reading.
- Empty Your Bladder: A full bladder can cause a small but significant increase in blood pressure. Always use the toilet before you sit down to take your measurement.
Step-by-Step Instructions
Prepare Your Body and Environment
Find a quiet room where you can sit undisturbed. Turn off the television and put your phone on silent. Sit down in a comfortable, supportive chair with your back straight and supported. Place both feet flat on the floor, ensuring your legs are not crossed. Crossing your legs can constrict blood flow and artificially increase your reading.
Once you are seated comfortably, rest for 3 to 5 minutes. This quiet period allows your body to relax and your blood pressure to settle to its true resting level. Do not skip this step, even if you feel calm.
Position Your Arm Correctly
Roll up the sleeve on your chosen arm so the cuff can be placed on bare skin. Placing the cuff over clothing, even thin fabric, can cause an inaccurate reading. Rest this arm on a table or armrest so that your upper arm is supported at the same level as your heart. If the table is too low, use a pillow or cushion to raise your arm to the correct height.
Positioning your arm below heart level can lead to a falsely high reading, while positioning it too high can result in a falsely low reading. Keep your palm facing upwards and let your arm and hand relax completely. Do not clench your fist.
Fit the Cuff Securely
Slide the cuff onto your upper arm. The bottom edge of the cuff should be about 2-3 cm (roughly 1 inch) above the bend of your elbow. Most cuffs have a marker or arrow to indicate where it should align with the brachial artery. This artery runs along the inside of your upper arm; the tube from the cuff should generally point down the centre-front of your arm.
Fasten the cuff so it is snug but not uncomfortably tight. You should be able to fit two fingertips between the cuff and your arm. If the cuff is too loose, the reading may be artificially low. If it is too tight, the reading can be falsely high and the process may be painful.
Take the First Reading
Once you are comfortable and the cuff is in place, press the 'Start' button on your monitor. The cuff will begin to inflate. It is vital to remain still and silent throughout this process. Do not talk, check your phone, or move your body, as this can affect the measurement. Breathe calmly and normally.
The cuff will inflate to a pressure higher than your systolic blood pressure and then slowly deflate. The monitor senses the vibrations in your artery as blood flow returns. When the cycle is complete, the monitor will display your systolic pressure (top number), diastolic pressure (bottom number), and your pulse rate.
Record the First Reading
Immediately write down the results in your logbook. Note the date, the time of day, and the full reading (e.g., 125/80 mmHg) and your pulse. It is also good practice to note which arm was used. While many devices have an internal memory, a physical or digital log provides a reliable backup and is easier to share and discuss during a consultation with your GP or practice nurse.
Take a Second Reading
Wait for one to two minutes after the first measurement. This allows the blood vessels in your arm to return to normal. Do not remove the cuff during this time. Remain in the same relaxed, seated position.
After the waiting period, press the 'Start' button again to take a second reading. As before, remain still and silent until the measurement is complete. Taking a second reading helps to ensure the result is consistent and representative of your true blood pressure at that moment.
Record and Average Your Readings
Record the second set of numbers in your logbook next to the first. If the two readings are close, your GP may ask you to use the average of the two. If there is a large difference between them (e.g., more than 10 mmHg), wait another minute and take a third reading. In this case, standard medical advice is often to disregard the first reading and average the second and third.
Always follow the specific instructions given to you by your healthcare provider regarding how to record and interpret your results. They are interested in the pattern of your readings over time, not just a single measurement.
Common Problems When You Check Blood Pressure At Home
| Problem | Likely Cause & Solution | Why It Matters |
|---|---|---|
| Readings seem too high or low. | Review your technique. Common errors include: talking during the reading, arm not at heart level, crossed legs, measuring over clothing, or not resting for 5 minutes beforehand. Relax and re-measure after checking your setup. | Correct technique is essential for accuracy. Small errors can skew readings by 10 mmHg or more, leading to a misrepresentation of your health. |
| The monitor displays an "Error" message. | This often happens if you move or talk during the reading. It can also indicate an issue with the cuff placement (too loose/tight) or the batteries being low. Check the cuff, replace batteries if needed, and try again, remaining perfectly still. | The monitor's sensors are highly sensitive to movement. An error message means the device could not get a reliable reading. |
| Readings vary significantly. | This can be caused by not waiting long enough between measurements, changing your position, or feeling anxious. An irregular heartbeat (atrial fibrillation) can also cause fluctuations. Ensure you wait 1-2 minutes and stay relaxed. If it persists, discuss it with your GP. | While some variation is normal, large, consistent swings may indicate an underlying issue that warrants a professional medical opinion. |
| The cuff feels painful when inflating. | The cuff may be on too tightly, or the wrong size for your arm. It can also be a sign of a genuinely high blood pressure reading. Stop the measurement, check the fit, and if it remains painful on subsequent attempts, consult your practice nurse or GP. | Discomfort can cause anxiety and muscle tension, which can further elevate your blood pressure reading. Proper fit is crucial for both comfort and accuracy. |
Advanced Tips for how to check blood pressure at home
Once you have mastered the basic technique, these tips can help improve the quality and usefulness of the data you collect.
Maintain Consistency
The most valuable information from home monitoring comes from a consistent routine. Try to measure your blood pressure at the same times each day, in the same location, and using the same arm. This creates a reliable set of data that minimises variables, making it easier for your doctor to spot trends.
Which Arm to Use?
When you first start monitoring, it is recommended to check the pressure in both arms. A small difference between arms is normal. However, if there is a consistent and significant difference (e.g., more than 10-15 mmHg), you should mention this to your GP. For all future measurements, use the arm that gave the higher reading unless your doctor advises otherwise.
Focus on the Average, Not the Anomaly
Your blood pressure fluctuates throughout the day. A single high reading could be caused by stress, pain, or a measurement error. Do not panic. Your healthcare team is interested in the average of your readings over a period of several days or a week. This gives a much more stable and representative view of your blood pressure control.
Calibrate Your Device
Over time, home blood pressure monitors can lose accuracy. It's good practice to have your device checked every one to two years. You can often do this by taking your monitor to a GP or nurse appointment and comparing its reading with their calibrated equipment. Take a reading with your machine immediately after they take one with theirs to see how closely they match.
How To Check Blood Pressure At Home FAQ
What do the blood pressure numbers mean?
A blood pressure reading has two numbers, measured in millimetres of mercury (mmHg):
- Systolic Pressure (the top number): This is the highest level your blood pressure reaches when your heart beats, forcing blood around your body.
- Diastolic Pressure (the bottom number): This is the lowest level your blood pressure reaches as your heart relaxes between beats.
As a general guide from the NHS, ideal blood pressure is usually considered to be between 90/60mmHg and 120/80mmHg. High blood pressure (hypertension) is considered to be 140/90mmHg or higher. Please remember these are general guides; your GP will advise you on your personal target range. This information is not a diagnosis.
How often should I check my blood pressure?
The frequency of measurement depends on your individual circumstances and your doctor's advice. When first diagnosed with high blood pressure or when changing medication, your GP might ask you to measure it twice a day for a week. For routine long-term monitoring, it may be less frequent. Always follow the schedule provided by your healthcare provider.
What should I do if my reading is very high?
If you get a single very high reading, remain calm. Anxiousness can raise blood pressure further. Wait five minutes in a quiet, relaxed state and take the measurement again. If it is still unusually high, contact your GP practice for advice. If your reading is extremely high (e.g., a systolic of 180 or higher OR a diastolic of 120 or higher) AND you are experiencing symptoms like chest pain, shortness of breath, weakness, numbness, or changes in your vision, this could be a medical emergency. You should seek immediate medical attention by calling 999.
Final Checklist for how to check blood pressure at home
Use this checklist before each measurement session to ensure you are following the correct procedure for an accurate reading.
- I am using a clinically validated, upper-arm blood pressure monitor.
- The cuff is the correct size for my arm.
- I have avoided caffeine, nicotine, and exercise for the last 30 minutes.
- I have rested quietly in my chair for at least 5 minutes before starting.
- My back is supported, my feet are flat on the floor, and my legs are uncrossed.
- The cuff is on my bare arm, which is supported and level with my heart.
- The bottom of the cuff is positioned 2-3 cm above my elbow crease.
- I will remain completely still and silent during the measurement.
- I plan to take at least two readings, spaced 1-2 minutes apart.
- I have my logbook ready to record the date, time, and results to share with my doctor.